
As a seasoned auto repair expert at cardiagnostictool.store, I understand the intricacies of vehicle electronics. Modifying or repairing your car’s Engine Control Unit (ECU) often requires a delicate procedure: ECU pin removal. Forget about those unreliable paper clip methods you might have stumbled upon online. This guide provides a definitive, professional approach to safely and effectively remove ECU pins across various car models and ECU types.
Whether you’re tackling an engine swap, converting to a manual transmission, or simply rewiring, this guide will equip you with the knowledge and techniques to handle ECU connectors with confidence. We’ll cover everything from essential tools to step-by-step instructions for different OBD generations, ensuring you can perform this task like a seasoned technician.
Essential Tools for ECU Pin Removal
Before diving into the specifics, let’s gather the necessary tools. Having the right equipment is crucial for preventing damage to your ECU connectors and ensuring a smooth, efficient pin removal process. Here’s what I recommend:
- Straight Pick Tool: Indispensable for manipulating retaining tabs in various connector types.
- Right-Angle Pick Tool: Especially useful for accessing and lifting locks in confined spaces, particularly in OBD2 connectors.
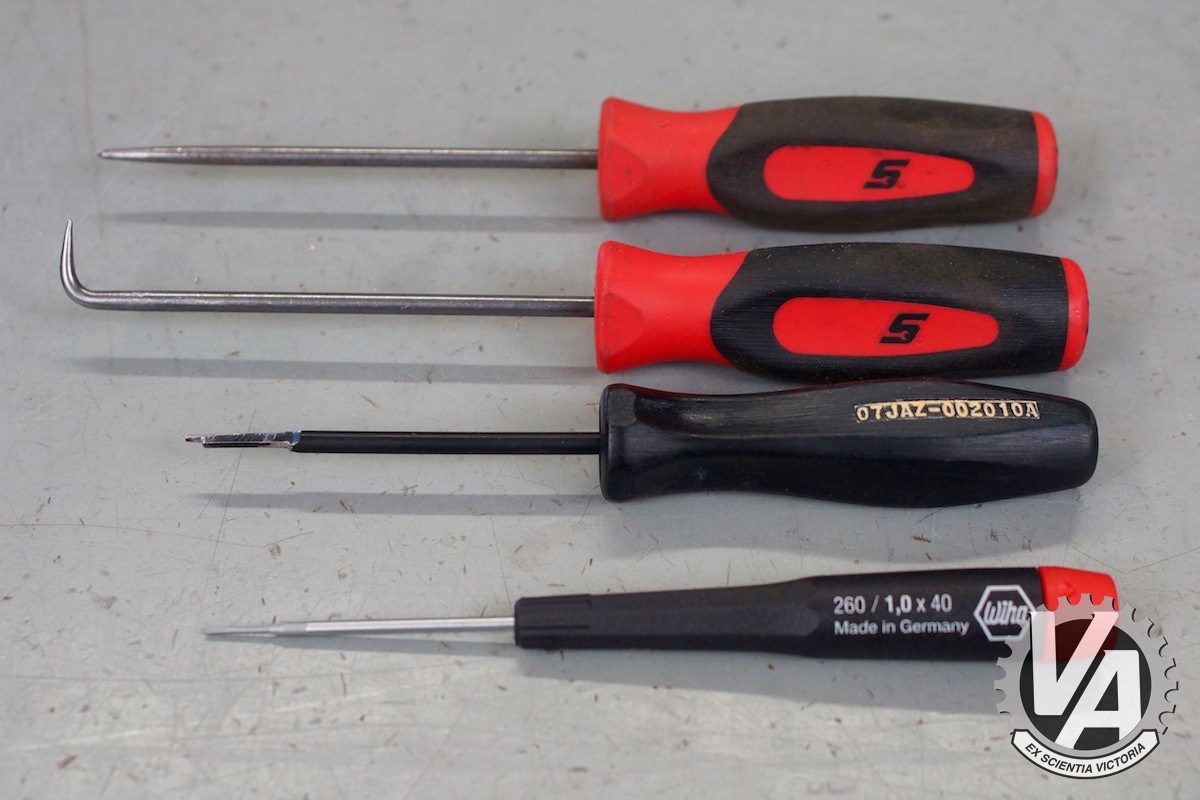
- Honda ECU Pin Removal Tool (Honda PN 07JAZ-002010A): While specific to certain Honda/Acura OBD0 connectors, this tool is invaluable if you’re working with older models.
- Precision Slot Screwdriver (1mm blade width): This is a must-have for gently lifting delicate plastic tabs without causing breakage. A Wiha precision slot screwdriver is highly recommended for its durability.
The essential tools for ECU pin removal: straight and right-angle pick tools, Honda ECU pin removal tool, and a precision slot screwdriver.
While pick tools are readily available, the Honda ECU pin removal tool and the precision slot screwdriver deserve special attention. The Honda tool is specifically designed for OBD0 connectors and might not be necessary for later models. However, if you’re working on classic Hondas or Acuras from the OBD0 era, acquiring this tool from your local Honda dealer using the provided part number is highly recommended.
The precision slot screwdriver is a universal necessity. Its fine blade is perfect for carefully lifting the small plastic tabs that secure pins within connectors. Avoid using it for tasks beyond lifting these tabs, as even its tool-steel construction can be vulnerable to breakage. Investing in a quality brand like Wiha ensures greater strength and longevity compared to cheaper alternatives.
Navigating Different OBD Generations for ECU Pin Removal
ECU connector designs have evolved across different OBD (On-Board Diagnostics) generations. Understanding these variations is key to applying the correct pin removal technique. Let’s explore the methods for each generation:
OBD0 (Pre-OBD)
Found in older Honda and Acura models like 1985-1991 Civics and 1987-1991 Integras, OBD0 connectors have distinct characteristics. The “A” plug is easily identified by its white color.
OBD0 A Plug:
These white plugs utilize individual retaining tabs within each pin opening. These tabs, positioned towards the center of the plug, prevent pins from backing out.
Close-up view inside an OBD0 A plug opening, showcasing the retaining tab that secures the pin. A pick tool is positioned to lift the tab.
To remove a pin from an OBD0 A plug:
- Insert the Straight Pick Tool: Slide the straight pick tool into the opening adjacent to the pin you intend to remove. Aim to contact the retaining tab.
- Lift the Retaining Tab: Gently lift the tab with the pick tool. You will feel slight resistance as you engage the tab.
- Gently Pull the Wire: While lifting the tab, carefully pull the wire connected to the pin from the back of the connector. Avoid pulling the wire before lifting the tab, as this can jam the mechanism.
Demonstration of sliding the straight pick tool into an OBD0 A plug opening to lift the retaining tab and release the pin.
Once the pin is removed, you’ll notice a rectangular opening where the retaining tab engaged to secure the pin.
View of an OBD0 A plug opening after pin removal, clearly showing the rectangular slot where the retaining tab was positioned.
OBD0 B and C Plugs:
The black B and C plugs in OBD0 systems differ slightly. They employ smaller pins and a white retaining lock (or clip) that must be removed before accessing individual pins.
An OBD0 B plug showing the tabs on each side that need to be depressed to remove the white retaining lock.
To remove pins from OBD0 B and C plugs:
- Depress Retaining Lock Tabs: Use the pick tool to depress the tabs located on each side of the white retaining lock. Access these tabs through the openings on the sides of the connector.
- Push and Remove Retaining Lock: While depressing the tabs, push the retaining lock upwards and out of the connector.
Close-up of an OBD0 B plug tab being depressed with a pick tool to allow for the removal of the retaining lock.
- Pry Out the Retaining Lock: Once the tabs are released, gently pry the retaining lock away from the connector.
The white retaining lock of an OBD0 B plug being pried out after the side tabs have been released.
- Completely Remove Retaining Lock: Ensure the retaining lock is fully removed to expose the pins for individual removal.
The OBD0 B plug with its retaining lock completely removed, preparing it for pin removal using the Honda special tool.
- Use Honda Pin Removal Tool: For OBD0 B and C plugs, the Honda special pin removal tool is essential. It’s designed to slide alongside the pin and depress a small metal tab that secures it within the connector.
Demonstration of the Honda ECU pin removal tool designed for OBD0 B and C plugs, showing its finger protrusion that contacts the pin’s retaining tab.
- Slide in Honda Tool: Insert the Honda pin removal tool into the rectangular opening between the pin rows. Orient the tool so its finger protrusion faces the pin you want to remove.
Inserting the Honda ECU pin removal tool into an OBD0 B plug, aligning the tool’s protrusion with the pin to be removed on the upper row.
- Depress Metal Tab: Slide the tool in until it bottoms out. This action will depress the metal tab on the pin.
Honda ECU pin removal tool in action, depressing the metal retaining tab on an OBD0 B plug pin to release it.
- Gently Pull the Wire: Once the tool is fully inserted, gently pull the wire from the back of the connector to remove the pin.
Final step of OBD0 B plug pin removal: gently pulling the wire while the Honda tool holds the tab open, successfully extracting the pin.
OBD1
Prevalent in 1992-1995 Civics and Integras, OBD1 systems are also popular for conversions to programmable ECUs. For OBD1 connectors, you’ll primarily need the straight pick tool and the precision slot screwdriver. These connectors feature flaps on the wire side that lock the pins and individual tabs inside the connector.
- Unlock the Flap Lock: Begin by using the precision slot screwdriver to pry open the flap lock located near the connector ends.
Prying open the lock flap on an OBD1 ECU plug using a precision slot screwdriver to access the pins.
- Open Lock Flap: Fully open the lock flap to allow access to individual pins. Note that these flaps can become brittle with age and may break. Even if broken, they can often be reinstalled to provide some pin security after modification.
An OBD1 ECU plug with its pin lock flap fully opened, ready for individual pin removal.
- Insert Precision Slot Screwdriver: Slide the precision slot screwdriver alongside the metal pin from the front of the connector until you feel the plastic retaining tab. OBD1 connectors utilize both large and small pins, but the removal procedure remains consistent.
Inserting a precision slot screwdriver into the front of an OBD1 connector to locate and access the pin’s retaining tab.
- Pry the Retaining Tab: Gently pry the tab away from the pin using the screwdriver.
Using the precision slot screwdriver to gently pry the retaining tab away from the pin inside an OBD1 connector.
- Slide Wire Out: While holding the tab lifted, gently slide the wire out from the back of the connector. If resistance is encountered, re-check if the tab is fully disengaged.
Removing a pin from an OBD1 plug by sliding the wire out from the back while the retaining tab is lifted with a screwdriver.
OBD2A and OBD2B
Common in vehicles like the S2000, 1996-2001 Integra, and 1996-2000 Civic, OBD2A and OBD2B connectors require the right-angle pick and precision slot screwdriver. These connectors have a unique internal locking clip due to their multi-level pin arrangement.
- Pry Up Internal Lock: Use the right-angle pick tool to pry up the internal lock. Small notches within the connector are designed to accommodate the pick tool for lifting the lock.
Using a right-angle pick tool to pry up the internal lock of an OBD2 ECU plug, starting the pin removal process.
- Insert Precision Slot Screwdriver: With the lock lifted, insert the precision slot screwdriver into the opening next to the pin. Slide it in until you feel the plastic retaining tab.
Inserting a precision slot screwdriver into an OBD2 plug, positioned to access and lift the retaining tab of a pin.
- Lift the Retaining Tab: Carefully lift the tab away from the pin using the screwdriver. This step might require some finesse to get a feel for the mechanism without damaging the delicate plastic tab.
Prying the retaining tab away from the pin inside an OBD2 connector using a precision slot screwdriver to release the pin.
- Gently Pull Wire Out: While lifting the tab, gently pull the wire from the back of the plug. If it doesn’t release easily, re-lift the tab to ensure it’s fully disengaged.
Gently pulling the wire of an OBD2 plug while lifting the retaining tab, successfully removing the pin from the connector.
OBD2C
Used in K-series and early J-series ECUs, OBD2C connectors are similar to OBD2A and OBD2B in their locking mechanism and pin removal process. However, the pins are smaller, and the connector is more delicate. Handle with care and avoid excessive force.
- Pry Up Lock with Right-Angle Pick: Just like OBD2A/B, use the right-angle pick to gently pry up the lock in the small notches.
Using a right-angle pick tool to carefully pry up the lock on an OBD2C ECU plug, starting the pin removal sequence.
- Insert Precision Slot Screwdriver (1mm): The narrow 1mm precision slot screwdriver is ideal for OBD2C connectors due to the tight spacing. Slide it along the metal pin until you locate the tab.
Inserting a 1mm precision slot screwdriver into an OBD2C plug to access and lift the retaining tab of a pin.
- Pry Retaining Tab: Once you feel the tab, gently pry it away from the pin to release it.
Using the precision slot screwdriver inside an OBD2C plug to lift and disengage the retaining tab of a pin.
- Pull Wire and Pin Out: With the tab lifted, the wire and pin can now be gently pulled out from the connector.
Removing a pin from an OBD2C plug by gently pulling the wire after disengaging the retaining tab with a precision screwdriver.
OBD2D (and later)
Found in 2006-and-newer Civics and similar models like CR-Z and second-generation Fits with under-hood ECUs. These connectors are larger but operate on similar principles to OBD2C.
- Remove Plastic Guard (if present): Some OBD2D connectors have a plastic guard on the back. Remove this guard to access the wires.
- Lift Lock with Pick Tool: Use either the right-angle or straight pick tool to lift the connector lock.
Using a pick tool to lift the pin lock on a larger OBD2D ECU plug commonly found in newer vehicles.
- Insert Precision Slot Screwdriver: Slide the precision slot screwdriver along the metal pin until you feel the retaining tab.
Inserting a precision slot screwdriver into an OBD2D plug to access and prepare to lift the retaining tab of a pin.
- Lift Tab and Remove Wire: Lift the tab with the screwdriver and gently pull the wire to remove the pin.
Gently lifting the retaining tab on an OBD2D plug with a precision screwdriver to release the pin for removal.
A pin successfully removed from an OBD2D connector, demonstrating the completion of the pin removal process.
Conclusion
Congratulations! You now possess a comprehensive understanding of ECU pin removal techniques across various OBD generations. By using the right tools and following these step-by-step instructions, you can confidently and professionally modify your ECU wiring as needed. Armed with this knowledge, you’re well-equipped to tackle engine swaps, transmission conversions, and any other automotive wiring projects that come your way. You now know more than many self-proclaimed online “experts” – go ahead and impress your friends with your newfound expertise!