In today’s retail landscape, technology is essential for efficient sales operations. While sophisticated Point of Sale (POS) systems are prevalent, their cost can be prohibitive for small businesses and individual sellers. Microsoft Excel offers a viable and budget-friendly alternative. If you’re looking to learn how to create a basic cash register program, Excel, combined with VBA (Visual Basic for Applications), provides a practical solution.
This guide provides a step-by-step approach to building your own cash register program using Microsoft Excel and VBA, perfect for those learning or seeking a simple POS system.
Setting Up Your Excel Sheets
-
Sheet Organization: Begin by opening Microsoft Excel and creating four distinct sheets. Rename these sheets as follows: “Main,” “Stock,” and “Profit.” You can leave the first sheet named as “Sheet1” or rename it to “Dashboard” and customize its background color for visual appeal, though it won’t contain transactional data.
-
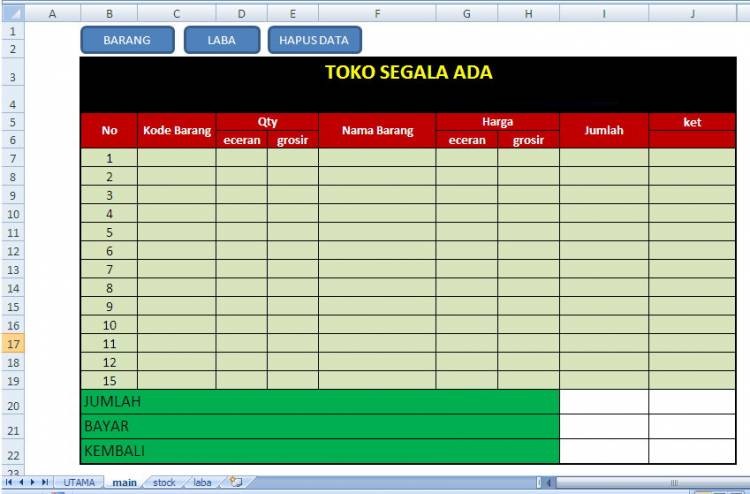
“Main” Sheet – Transaction Table: Navigate to the “Main” sheet. Here, you will construct a table to record sales transactions. Design the table with the following headers in row 6, starting from column B: “No,” “Product Code,” “Product Name,” “Quantity,” “Unit Price,” “Capital Price,” “Selling Price,” “Subtotal,” “Discount,” and “Total.” Below is an example of how your “Main” sheet should look.
-
Formulas for “Main” Sheet: Implement the following formulas in the specified cells to automate calculations:
-
Cell F7 (Product Name):
=IF(C7="","",VLOOKUP(C7,Stock!$B$4:$C$23,2,FALSE))– This formula automatically populates the product name based on the product code entered in column C, referencing the “Stock” sheet. -
Cell G7 (Capital Price):
=IF(D7="","",VLOOKUP(C7,Stock!$B$4:$F$24,3,FALSE))– This formula retrieves the capital price of the product from the “Stock” sheet based on the product code. -
Cell H7 (Selling Price):
=IF(E7="","",VLOOKUP(C7,Stock!$B$4:$E$23,4,FALSE))– This formula fetches the selling price from the “Stock” sheet. -
Cell I7 (Subtotal):
=IF(D7="","",G7*D7+H7*E7)– Calculates the subtotal for each item by multiplying quantity with the unit price. -
Cell J7 (Discount): `=IF( E7=””,””, IF(K7-D7-E7*L7 data-blogger-escaped-br=”” data-blogger-escaped-kurang=”” data-blogger-escaped-stock=””> – This formula calculates the discount, considering any potential stock reduction.
-
Cell I20 (Total Subtotal):
=IF(I7="","",SUM(I7:I19))– Sums up the subtotal of all items in the transaction. -
Cell I22 (Grand Total):
=IF(I20="","",I21-I20)– Calculates the final total after applying any discount.
-
-
“Stock” Sheet – Product Database: Proceed to the “Stock” sheet. Here, create a database of your products. Design a table with headers such as “No,” “Product Code,” “Product Name,” “Capital Price,” “Selling Price,” “Stock Quantity,” and “Profit per unit” starting from row 3. Populate this sheet with your product inventory details.
-
“Profit” Sheet – Profit Calculation: Go to the “Profit” sheet to set up profit tracking. Create a simple table to calculate profit. In cell C3, enter the formula:
=IF(Main!C7="","",VLOOKUP(Main!C7, Stock!$B$4:$H$23,7,FALSE)). In cell D3, input:=IF(Main!I7="","",(Main!I7-((Main!D7)+(Main!E7*Main!L7))*C3)). These formulas calculate profit based on sales data from the “Main” sheet and profit per unit from the “Stock” sheet.
Enhancing Functionality with VBA Macros
To improve user experience and navigation, incorporate VBA macros to create interactive buttons in the “Main” sheet.
-
Adding Buttons and VBA Code:
- Go to the “Main” sheet.
- Navigate to the “Developer” tab in Excel (you may need to enable it in Excel Options > Customize Ribbon).
- Click on “Insert” and choose a button form control (from Form Controls or ActiveX Controls). Draw buttons on your sheet for “Stock,” “Profit,” and “Clear Data.”
- To add VBA code, right-click on the sheet tab “Main,” and select “View Code.”
- Paste the following VBA script into the VBA editor:
Sub DeleteStuff() Dim c As Range For Each c In Range("C7:E19") If Not IsNumeric(c) Then c.ClearContents Next c End Sub Sub StockSheet() Sheets("Stock").Select End Sub Sub ProfitSheet() Sheets("Profit").Select End Sub- Now, assign these macros to the buttons you created. Right-click on each button, select “Assign Macro,” and choose the corresponding macro name (“DeleteStuff” for “Clear Data,” “StockSheet” for “Stock,” and “ProfitSheet” for “Profit”).
-
Creating a Userform for Main Menu:
- In the VBA editor (from step above), go to “Insert” > “UserForm.”
- Design your UserForm to serve as a main menu. Add command buttons for “Main,” “Stock,” “Profit,” and “Exit.”
- Double-click on each button in the UserForm and add the following VBA code for each:
'For CommandButton1 (Main) Private Sub CommandButton1_Click() Sheets("Main").Select Range("A1").Select End Sub 'For CommandButton2 (Stock) Private Sub CommandButton2_Click() Sheets("Stock").Select Range("A1").Select End Sub 'For CommandButton3 (Profit) Private Sub CommandButton3_Click() Sheets("Profit").Select Range("A1").Select End Sub 'For CommandButton4 (Exit) Private Sub CommandButton4_Click() Me.Hide 'Or Unload Me to completely close the form End Sub- To automatically show the UserForm when the Excel file opens, in the VBA editor, double click on “ThisWorkbook” in the Project Explorer (usually on the left side). In the code window for “ThisWorkbook,” add:
Private Sub Workbook_Open()
    UserForm1.Show
End Sub
Testing Your Excel Cash Register
With all setup and coding completed, test your new cash register program. Enter sample sales transactions in the “Main” sheet, ensuring product codes match entries in your “Stock” sheet. Observe how formulas automatically calculate product names, prices, subtotals, and totals. Navigate between sheets using the buttons you created to review stock levels and profit calculations.
Congratulations! You have successfully created a functional cash register program using Microsoft Excel. This basic system is a starting point and can be further customized to meet more specific needs. This DIY approach offers a cost-effective solution for managing sales and inventory for small-scale operations.