
When your car’s Malfunction Indicator Light (MIL), commonly known as the check engine light, illuminates, it’s signaling that something isn’t right under the hood. Modern vehicles are equipped with sophisticated Engine Control Units (ECUs) that monitor a vast array of engine components and systems. When the ECU detects a problem, it not only turns on the warning light but also stores diagnostic trouble codes. These codes are crucial for pinpointing the source of the issue, and you might be surprised to learn that accessing them can be done without expensive diagnostic tools. This guide will walk you through how to perform basic Car Engine Diagnostics Ecu checks using a simple paperclip or wire, allowing you to read these error codes yourself.
Understanding Your Car’s Diagnostic System and ECU Error Codes
The ECU is essentially the brain of your car’s engine management system. It constantly monitors sensors throughout your vehicle, from oxygen levels in the exhaust to engine temperature and throttle position. When a sensor reading falls outside of the expected parameters, or if a component malfunctions, the ECU registers this anomaly. This is often indicated by the check engine light appearing on your dashboard. Crucially, the ECU also logs a specific error code corresponding to the detected problem. These car engine diagnostics ecu codes are standardized and provide valuable clues for mechanics and DIY enthusiasts alike to diagnose and repair vehicle issues efficiently.
Step-by-Step Guide: Reading ECU Codes with a Paperclip
For many older vehicles, and some specific models, accessing these car engine diagnostics ecu codes is surprisingly straightforward and doesn’t require a dedicated OBD-II scanner. You can use a simple paperclip or a short length of wire to bridge specific terminals in your car’s diagnostic port. Here’s how:
-
Locate the Diagnostic Port: The diagnostic port is typically located within the driver’s side dashboard area. Common locations include under the steering column or in the glove box. Refer to your vehicle’s service manual if you are unsure of its exact location.
-
Identify the Correct Terminals: For many Toyota vehicles and similar makes, you will be looking for the TE1 and E1 terminals in the diagnostic port. For VVTi engines, the terminals are often Tc and E1. Diagrams and online resources specific to your car model (like the example provided for MKIV Supra) can be invaluable in correctly identifying these terminals. Always double-check your vehicle’s service manual or reliable online sources to confirm the correct terminals for your specific make and model before proceeding.
-
Prepare to Read Blink Codes: Turn your ignition key to the “ON” position (position 2), but do not start the engine. Ensure any aftermarket immobilizers are deactivated, as they can interfere with the diagnostic process by preventing the check engine light from flashing correctly.
-
Bridge the Terminals: Using your paperclip or wire, carefully bridge the identified terminals (e.g., TE1 and E1, or Tc and E1).
-
Observe the Check Engine Light: Watch the check engine light (orange, not the red MIL light if there are two separate lights). If the system is working correctly and there are no stored codes, the light will flash at a steady, regular pace. If there are stored car engine diagnostics ecu codes, the light will blink in a sequence to represent the code numbers.
-
Interpreting the Blink Codes: The error codes are communicated through a series of blinks. A blink sequence consists of:
- Blinks representing the first digit of the code: The check engine light will blink a number of times corresponding to the first digit of the error code.
- A short pause.
- Blinks representing the second digit of the code: The light will then blink again, the number of blinks indicating the second digit.
- A longer pause before the sequence repeats for the same code, or moves on to the next stored code.
For example, a sequence of “blink, blink, blink… pause… blink… long pause” would indicate error code 31. The system will cycle through all stored codes from lowest to highest and then repeat the entire sequence.
Deciphering Error Codes and Next Steps in Diagnostics
Once you have read the blink codes, you’ll need to consult a car engine diagnostics ecu code list specific to your vehicle’s make and model to understand what each code signifies. These lists are readily available online, in repair manuals, or through automotive diagnostic resources.
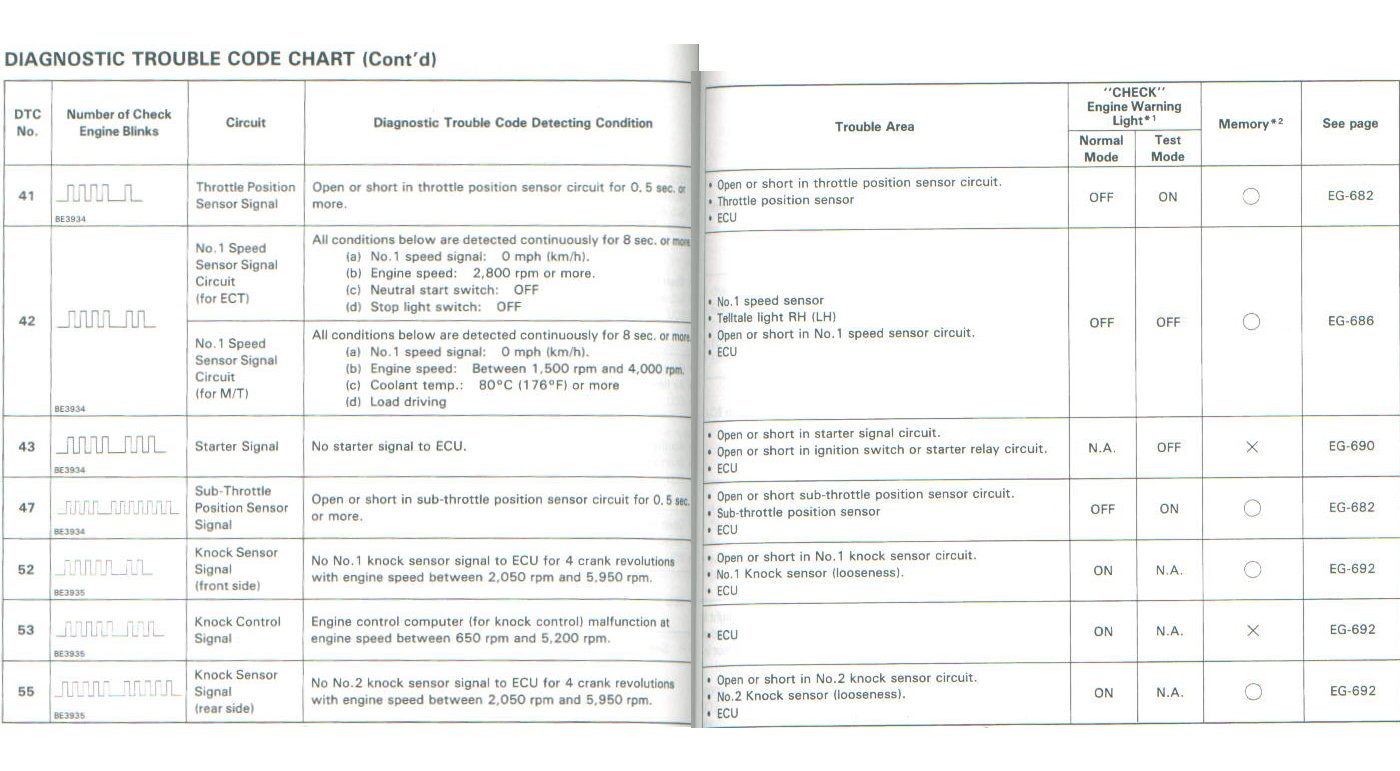
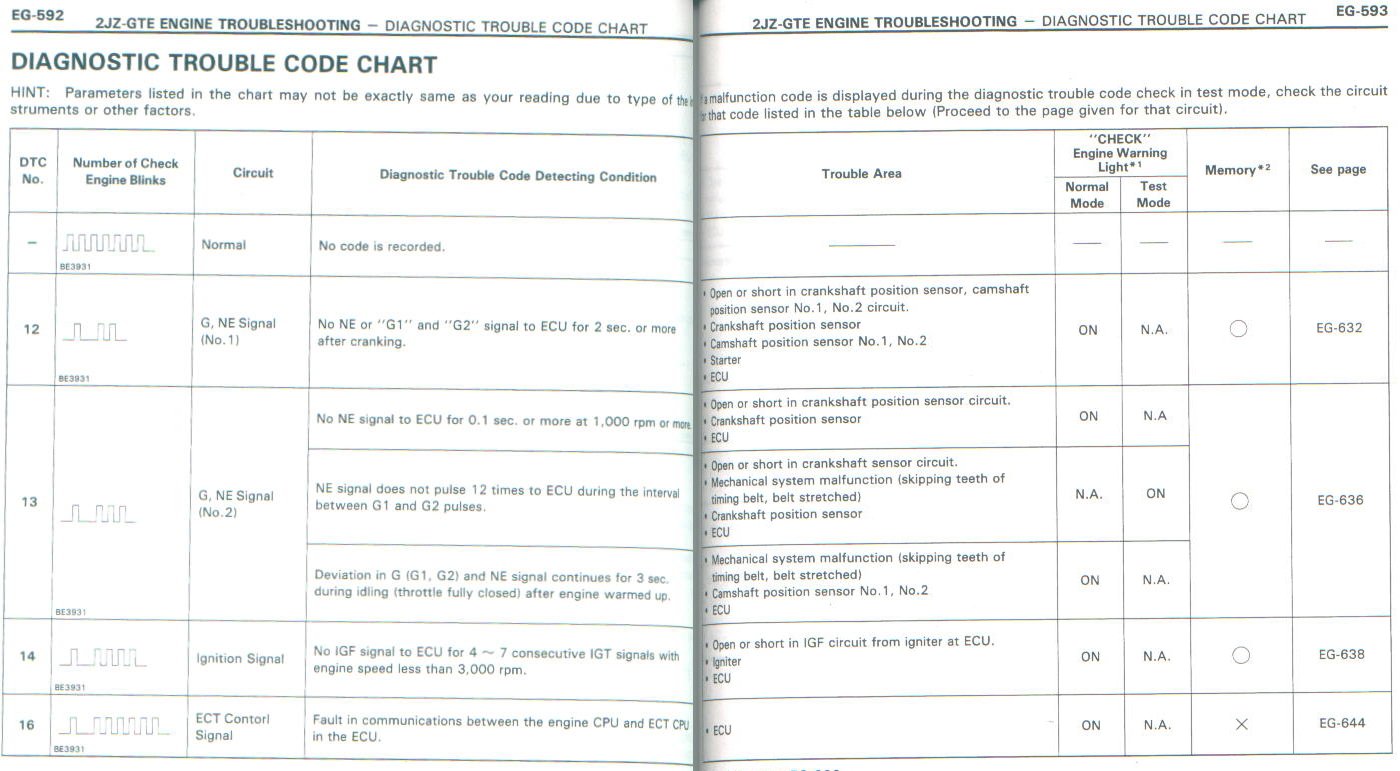
For instance, in the example provided in the original article, code 14 indicates a “problem in the ignition circuit,” and code 42 points to a “No. 1 speed sensor problem.” Understanding these codes is the first step in effective troubleshooting.
It’s important to remember that stored codes can sometimes be “red herrings,” especially if they are old and the issue has been intermittent or resolved. After noting down the codes, it’s generally a good practice to reset the ECU to clear the stored codes.
Resetting the ECU and Clearing Error Codes
Error codes are stored indefinitely until the ECU is reset. This can be done in a few ways:
- Fuse Removal: Locate and remove the ECU fuse for about 30 seconds, then replace it.
- Battery Disconnect: Disconnect the negative battery terminal for a few minutes and then reconnect it.
After resetting the ECU, drive your vehicle and try to replicate the conditions that triggered the check engine light in the first place. If the problem persists, the check engine light will likely reappear, and new error codes will be stored. Reading these new codes after a reset will provide a clearer picture of the current issues and help you focus your diagnostic efforts effectively.
Conclusion: Empowering DIY Car Diagnostics
Performing basic car engine diagnostics ecu checks using the blink code method is a valuable skill for any car owner. It allows you to gain initial insights into potential engine problems without immediately resorting to professional diagnostic services. By understanding how to read and interpret these codes, you can be better informed when seeking repairs, potentially saving time and money. While this method is not as comprehensive as modern OBD-II scanners, it serves as an excellent starting point for DIY troubleshooting and understanding your vehicle’s health. Remember to always consult your vehicle’s service manual and reliable resources for accurate information specific to your car model.
